

Cloudfront is an Amazon web service that helps us to speed up the distribution of both static and dynamic web content. CloudFront delivers web content through a worldwide network of data centers called edge locations. This web service conjointly offers businesses and web application developers a simple and cost-effective way to distribute content with low latency and high data transfer speeds.
Enabling CloudFront in wordpress
CloudFront speeds up the wordpress website in the following ways
- Anycast DNS route the customer to the nearest edge location.
- Cached content are delivered to the users from the edge location.
- When data needs to be fetched from the site CloudFront optimizes network throughput by managing the transfers between Edge Locations and the website. This traffic runs over the Amazon Global Backbone, where optimized TCP configuration ensures more bytes are in-flight on the network, improving throughput, while TCP connection re-use eliminates much of the latency associated with establishing connections. In this way, whether content is cached or not, it will be accelerated by delivery over optimized network paths.
- Finally, negotiating and offloading Transport Layer Security (TLS) at the CloudFront Edge further improves performance, reducing connection setup latency, and further supporting back-end connection re-use.
There are two ways we can associate CloudFront with the WordPress site
Approach 1
Upload all the wordpress static files (contents in wp-content and wp-includes folders) onto a Amazon S3 bucket and set the S3 bucket as Cloudfront distribution origin.
Advantage – if we ever change the WordPress host, the entire wp-content folder is stored off-site at Amazon S3, so you don’t need to even copy the wp-content folder to your new WordPress installation
Approach 2
“Origin Pull” – accessing files directly from the website.
Advantage – This is easier and cheaper, we don’t need to upload the files to Amazon each time you make a new post.
1) Create a user and user group in IAM
- Create a new group (give any name) and give administrative privilege.
- Create a user + click on add user + give username + grand programmatic access click on permissions and assign it to the group that we created and then click on create the user.
- Copy the access key and secret access key (or download them).
2) Create an S3 bucket
- Create an S3 bucket.
- Set the domain name as the S3 bucket name.
- Make sure that the IAM user created in the earlier step has sufficient read permission to access the S3 bucket.
3) Create a CloudFront distribution
- Create a Cloudfront web distribution.
- Select the S3 bucket as the origin name in the Cloudfront web distribution.
- Leave the rest of the options as default.
- Create the distribution.
4) Setting up the WordPress w3-total-cache plugin
- Log in to the WordPress dashboard and install w3-total cache plugin.
- Select “General settings” from W3 Total Cache Performance Menu
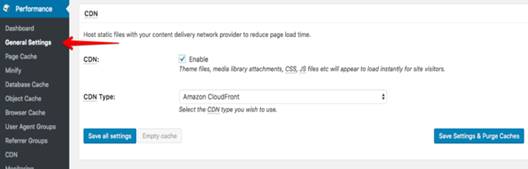
- Tick the box to enable CDN and select AWS CloudFront as CDN type.
- Click the Save All Settings Button.
- Select CDN from the W3 Total Cache Performance Menu
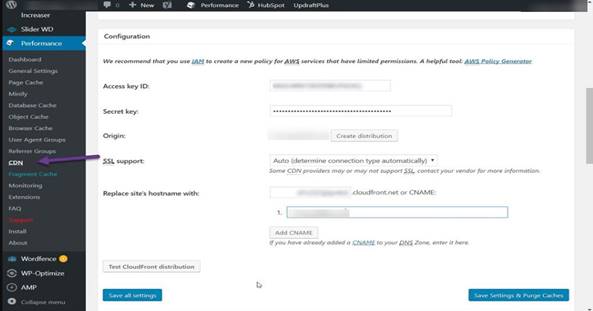
Set the following values
Access Key ID:
Secret Key ID:
Origin: <s3 bucket name(should be same as the domain name)>
Replace site’s Hostname with: <CNAME set in the CloudFront Distribution>
- Click the “Test CloudFront Distribution” button at the bottom of the configuration section of W3 Total Cache.
- If you see the message “Test passed”, and then click on the “Save Settings & Purge Caches” button
- Click on the upload attachment button and click on start
- This will upload all your WordPress contents to the s3 bucket
- Same way you can click on the upload attachment buttons of other sections and upload the desired contents to the s3
5) Setting Up CloudFront With WP Super Cache (Alternative plugin)
-
- Log in to the WordPress dashboard and install WP Super Cache
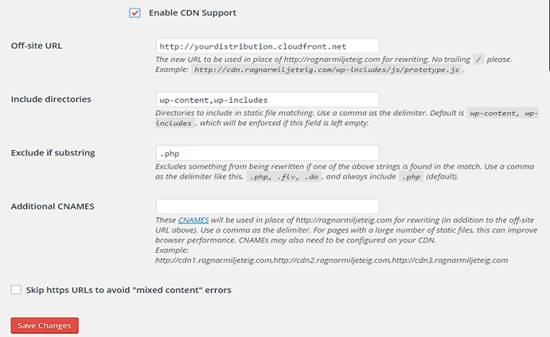
Set the following values.
Off-site URL: <CloudFront Distribution>
Additional CNAMEs: <CNAME of the CloudFront Distribution>
- Now the content will be loaded from the AWS CloudFront instead of the old server.
- (For confirmation, you can check the URL of the images that are been loaded by opening the image in a new tab).
Conclusion
By using CloudFront for the WordPress Websites which are been accessed globally makes the pages to load faster. For all the WordPress users it’s a great suggestion to use CloudFront CDN technology for their websites. CloudFront can be implemented in various CMS such as Drupal, Magento, etc.